...


Wednesday, November 17, 2010
Thursday, November 11, 2010
Wednesday, November 3, 2010
BJC-6000.WASTE INK TANK.
What Canon calls the "waste ink tank" is really several very thick felt pads stacked on each other. Cleaning cycles pump ink out of the heads and a hose sprays it in a pad so it soaks into the felt pads from the bottom up. The printer simply counts the number of cleaning cycles it has performed and when it hits a certain count it warns you, when it hits a higher count it stops printing. Good news, bad news: you can reset the printer, but if you don't replace or clean the waste ink pad you run the risk of overflow.
This is straight from the CANON Australia service manual.
Follow the steps carefully to reset the Waste Ink Pad Full condition.
After you have done this and confirmed that it is reset and printing again, it's time to remove and clean the waste ink pad, and the rest of the printer as long as you have it open. Following are instructions based on the BJC-6000. Most Canon printer cases seem to be built along the same lines.
 First, get the cover off. You'll need to remove the parallel port cover first. There's a slot at the bottom of the parallel port cover, stick a flatbladed screwdriver in there and gently pry it out. Most Canon printers are very similar.
 There are 4 Lights! Er, there are 4 plastic tabs holding the top on. You can reach the front ones by reaching inside the printer and gently bending them back while lifting the top.
 The other two are on the sides near the back. There are slots, press a flat bladed screwdriver gently in the slot to push the tab back while gently lifting the top. DO NOT PRY!
All the Canons I've taken apart then have four screws that hold the entire printer mechanism on the plastic base. Some models do have a power supply module that slides out of the rear of the case, remove this first. -Only- remove the four screws holding the printer mechanism onto the lower case. Some models may have more screws, but becareful not to remove any other screws! It just lifts off. Set it up on a couple of boxes or chunks of wood under the tabs so the mechanism is reasonably level.
Now is a good time to take it outside and use dry canned air to blow out the paper dust in the back of the printer. Do -not-, repeat NOT use an air compressor! It is too much pressure, and air from a compressor or air tank is full of moisture and oil. And stay away, AWAY from the print head and the park pad and cleaning pump under it. Stay away from the paper path under the print head groove. If you don't, you can end up blowing ink sludge around the printer or blow air into the heads or inadvertently create a suction that pulls ink out the heads and blows it around the printer.
If you aren't wearing rubber gloves by this point, put them on now. The waste ink pad can hold an -incredible- amount of ink, partially dried so it is a lot more color than it looks. Do -not- do this in your bathroom sink! If your porcelain is worn at all or has any invisible mineral deposits, the ink can permanently stain it. Open a couple of windows and set up a fan as you'll be working with ammonia and alcohol. I know from experience that the fumes can sneak up on you.
Mix up a liter of cleaning solution in a clearly labeled, resealable container:
Take the bottom printer case and run hot water over it to wash the ink out. You don't need to get it like new, just get the big blobs of goopy ink out. Pour some of the cleaning mixture in to help break it up. Dry it out with an old towel or paper towels and set it aside to dry.
Set the waste ink pads in the sink. Pour some of the cleaning mixture into them to dissolve the ink, then gently run hot water through to rinse it out. It will never look clean, don't try, just get it so there is little ink left in the wash water. It is a rather fragile felt-like substance so if you try too hard, you can end up destroying it.
Squeeze out as much water as you can. Do -not- twist it like a towel! You'll have to let it dry for several days. Put it over a heat vent if you have central air heating, or just in a sunny window. If you don't put it somewhere warm or with some air flowing, it will stay damp a long, long time. You can even lean it up against a box fan on low. I caution -against- putting it in front of an electric heat fan because of the fire hazard.
I have considered running a tube out from the park pad's waste tube to a bottle outside the printer. However, if you do this you run the risk of the bottle getting knocked over or leaking.
Look over the printer mechanism. You'll see some areas of ink build-up. Ink and paper dust mix to make a viscous mud that stays wet for a long time. I use cotton ear buds (aka Q-Tips or cotton swabs) to pick up the blobs, it is better if you can get some of the absorbant foam swabs. Then a premoistened window wipe to wipe off the rest.
Note: Don't use paper towels! Paper towels are horrible things that shed little bits all over. Any little bits that get on the bottom of the head, or on the park pad will cause ink to wick out or block a nozzle. Test the premoistened window wipes you intend on using; tear one in half. If it looks a bit like you tore a sheet of paper it's good; ie, a ragged but basically clean tear. If it looks like a cotton ball exploded it's bad! IE, threads or filaments everywhere.
I use Coralite brand window wipes. Ironically, cheap is better. No lemony scents, no vinegar wipes. Just plain old ammonia based premoistened window wipes.
After everything is dry, reassemble everything but the top of the case. Locate the lid detector switch, it is usually somewhere near the hinge of the lid. Use something like a small piece of vinyl electrical tape to hold it down so the printer thinks the lid is shut. After confirming that everything is back in place (except the top case), plug it in. Turn the printer on, confirm that everything moves as it should on power-up (basically nothing sticks or bangs).
Take the tape off the switch so it thinks the lid is open, this should cause it to move the print heads to the Cartridge Change position. Unplug the printer! This is important, so it doesn't suddenly decide you are taking too long and move the heads. If you have a holder for the print heads, take them out and put it in it. If not, set the print heads on top of a folded up premoistened window wipe. Ink will wick out, so you don't want to leave it too long this way.
Using several of your lint-free premoistened window wipes, carefully wipe up around the park pads. Careful! The park pads "float" in their holder and if you are not gentle you will knock it out of it's mount and it won't seal to the print heads properly. You may use a cotton swab moistened with cleaning solution to get the clumps, but don't touch the foam inside the park pad with it. That foam is really a hard plastic and will grab bits of cotton fiber and cause ink wicking.
Use an eyedropper to put cleaning solution into the park pad foam until it is visibly wet and wick it back out with a window wipe. Repeat. Again, you aren't going for spic-and-span, just the bulk of the ink. Put a few drops back in so it just looks wet.
There is a rubber and felt wiper just to the left of the park pads. It is probably retracted (towards you) but don't try and force it out. If it slides out easily, fine, again get the blobs off with dry swabs. Then wet the swabs with cleaning solution to get most of the ink off, and to get some of the ink out of the felt that is on one side of the wiper blade. Be gentle! It is very easy to accidentally knock this off of its mount or pull it out all together.
Without flipping the print heads upside down, wipe off the excess blobby ink around the edges. It is imperative that you do not touch the heads anywhere with cotton swabs, cotton cloth, or paper towels! Use the lint-free premoistened window wipes, and do -not- press against the bottom of the heads at all. I fold up a window wipe into sort of a cushion and wipe gently across the bottom. Do this only after cleaning around the edges or you'll just wipe that ink/paper sludge across the print nozzles. Again, it does not have to be spotless.
Reinstall the print heads, put the tape back on the lid switch. Plug the printer in, turn it on, let it finish it's cleaning cycles and gyrations. Turn the printer off again.
On my BJC-6000 and several models, you can get it to print a nozzle check by holding down the Resume/Paper Feed button while turning it on. It beeps once when you turn it on, let go of the Power button but keep holding the Resume button. If you let go after one beep, it does a quick head clean, if you let go after two beeps it prints a nozzle check and alignment check. Three and it just feeds a sheet of paper. Or just connect it to your computer and use the driver Maintenance menu.
Confirm everything is printing correctly again, power off and reinstall the top case. Your Canon should now work for many more years.
If the printheads are badly clogged and the printer driver cleaning cycles aren't fixing it, you may try the following:
First effort: put a few drops of cleaning solution onto the park pad "sponge". This is that sponge-looking thing (actually a hard plastic foam) where the head sits when not printing. Just do whatever it takes on that printer to unpark the heads as if you were going to change cartridges, then close it up and let it sit for a day before you run a cleaning cycle and nozzle check again.
Extremely Thorough Cleaning: Take the head out, remove the cartridges. If you've saved the orange seals, tape them onto the cartridges, if not then wrap black electrical tape around so it covers the ink outlet and the little air inlet on top. Only pull it snug across the ink outlet, not tight, and fairly loose on the cartridge body to prevent tape creep.
I then just stick the head under a stream of hot tap water. I use a soft plastic eyedropper to squirt the above cleaning fluid into the ink inlet meshes on the head and to flush ink off the bottom of the head. Careful not to touch the nozzles!
As you squirt cleaning fluid into the screen, a lot will rush back out, that is fine as it is flushing ink and gunk back out rather than forcing it through the nozzles, which are far finer than a human hair.
When you see little or no more color in the water or cleaning solution, force some of the straight filtered/distilled water into the screens. Rinse the outside of the print head with straight isopropyl alcohol (99% is better than 50% for this) and pat dry with a clean cotton towel (-not- paper towels) and again, DO NOT TOUCH THE NOZZLES.
Patience is a virtue. I've bought a lot of Canon printers in thrift stores with full cartridges because the heads clogged, they bought new cartridges, that didn't fix it so they tossed it at Goodwill. I clean them up and for $12.95 I get $45 worth of brand new cartridges and a backup printer. I only had two heads be unsaveable, those would print on all nozzles but had sprung internal leaks between two colors, cyan and yellow. The symptom was yellow nozzle checks print green, and the ink inside the yellow cartridge slowly turns green.
This is straight from the CANON Australia service manual.
Follow the steps carefully to reset the Waste Ink Pad Full condition.
- With the printer powered off, press and hold the RESUME button, press and hold the POWER button. The buzzer will sound once.
- While holding down the POWER button, release the RESUME button. Press the RESUME button twice in succession, and then release the POWER button. (Each time the RESUME button is pushed, the buzzer will sound once.) The indicator will blink in green, and then light in green.
- Press the RESUME button 3 times.
- Press the POWER button. The buzzer will sound once. The printer will switch off itself after performing the function.
After you have done this and confirmed that it is reset and printing again, it's time to remove and clean the waste ink pad, and the rest of the printer as long as you have it open. Following are instructions based on the BJC-6000. Most Canon printer cases seem to be built along the same lines.
 First, get the cover off. You'll need to remove the parallel port cover first. There's a slot at the bottom of the parallel port cover, stick a flatbladed screwdriver in there and gently pry it out. Most Canon printers are very similar.
 There are 4 Lights! Er, there are 4 plastic tabs holding the top on. You can reach the front ones by reaching inside the printer and gently bending them back while lifting the top.
 The other two are on the sides near the back. There are slots, press a flat bladed screwdriver gently in the slot to push the tab back while gently lifting the top. DO NOT PRY!
All the Canons I've taken apart then have four screws that hold the entire printer mechanism on the plastic base. Some models do have a power supply module that slides out of the rear of the case, remove this first. -Only- remove the four screws holding the printer mechanism onto the lower case. Some models may have more screws, but becareful not to remove any other screws! It just lifts off. Set it up on a couple of boxes or chunks of wood under the tabs so the mechanism is reasonably level.
Now is a good time to take it outside and use dry canned air to blow out the paper dust in the back of the printer. Do -not-, repeat NOT use an air compressor! It is too much pressure, and air from a compressor or air tank is full of moisture and oil. And stay away, AWAY from the print head and the park pad and cleaning pump under it. Stay away from the paper path under the print head groove. If you don't, you can end up blowing ink sludge around the printer or blow air into the heads or inadvertently create a suction that pulls ink out the heads and blows it around the printer.
If you aren't wearing rubber gloves by this point, put them on now. The waste ink pad can hold an -incredible- amount of ink, partially dried so it is a lot more color than it looks. Do -not- do this in your bathroom sink! If your porcelain is worn at all or has any invisible mineral deposits, the ink can permanently stain it. Open a couple of windows and set up a fan as you'll be working with ammonia and alcohol. I know from experience that the fumes can sneak up on you.
Mix up a liter of cleaning solution in a clearly labeled, resealable container:
- 1 part nonsudsing household ammonia (clear, no perfumes)
- 4 parts 50% Isopropyl Alcohol (aka Isopropanol) (clear, no perfumes)
- 5 parts filtered or distilled water (-not- purified)
Take the bottom printer case and run hot water over it to wash the ink out. You don't need to get it like new, just get the big blobs of goopy ink out. Pour some of the cleaning mixture in to help break it up. Dry it out with an old towel or paper towels and set it aside to dry.
Set the waste ink pads in the sink. Pour some of the cleaning mixture into them to dissolve the ink, then gently run hot water through to rinse it out. It will never look clean, don't try, just get it so there is little ink left in the wash water. It is a rather fragile felt-like substance so if you try too hard, you can end up destroying it.
Squeeze out as much water as you can. Do -not- twist it like a towel! You'll have to let it dry for several days. Put it over a heat vent if you have central air heating, or just in a sunny window. If you don't put it somewhere warm or with some air flowing, it will stay damp a long, long time. You can even lean it up against a box fan on low. I caution -against- putting it in front of an electric heat fan because of the fire hazard.
I have considered running a tube out from the park pad's waste tube to a bottle outside the printer. However, if you do this you run the risk of the bottle getting knocked over or leaking.
Look over the printer mechanism. You'll see some areas of ink build-up. Ink and paper dust mix to make a viscous mud that stays wet for a long time. I use cotton ear buds (aka Q-Tips or cotton swabs) to pick up the blobs, it is better if you can get some of the absorbant foam swabs. Then a premoistened window wipe to wipe off the rest.
Note: Don't use paper towels! Paper towels are horrible things that shed little bits all over. Any little bits that get on the bottom of the head, or on the park pad will cause ink to wick out or block a nozzle. Test the premoistened window wipes you intend on using; tear one in half. If it looks a bit like you tore a sheet of paper it's good; ie, a ragged but basically clean tear. If it looks like a cotton ball exploded it's bad! IE, threads or filaments everywhere.
I use Coralite brand window wipes. Ironically, cheap is better. No lemony scents, no vinegar wipes. Just plain old ammonia based premoistened window wipes.
After everything is dry, reassemble everything but the top of the case. Locate the lid detector switch, it is usually somewhere near the hinge of the lid. Use something like a small piece of vinyl electrical tape to hold it down so the printer thinks the lid is shut. After confirming that everything is back in place (except the top case), plug it in. Turn the printer on, confirm that everything moves as it should on power-up (basically nothing sticks or bangs).
Take the tape off the switch so it thinks the lid is open, this should cause it to move the print heads to the Cartridge Change position. Unplug the printer! This is important, so it doesn't suddenly decide you are taking too long and move the heads. If you have a holder for the print heads, take them out and put it in it. If not, set the print heads on top of a folded up premoistened window wipe. Ink will wick out, so you don't want to leave it too long this way.
Using several of your lint-free premoistened window wipes, carefully wipe up around the park pads. Careful! The park pads "float" in their holder and if you are not gentle you will knock it out of it's mount and it won't seal to the print heads properly. You may use a cotton swab moistened with cleaning solution to get the clumps, but don't touch the foam inside the park pad with it. That foam is really a hard plastic and will grab bits of cotton fiber and cause ink wicking.
Use an eyedropper to put cleaning solution into the park pad foam until it is visibly wet and wick it back out with a window wipe. Repeat. Again, you aren't going for spic-and-span, just the bulk of the ink. Put a few drops back in so it just looks wet.
There is a rubber and felt wiper just to the left of the park pads. It is probably retracted (towards you) but don't try and force it out. If it slides out easily, fine, again get the blobs off with dry swabs. Then wet the swabs with cleaning solution to get most of the ink off, and to get some of the ink out of the felt that is on one side of the wiper blade. Be gentle! It is very easy to accidentally knock this off of its mount or pull it out all together.
Without flipping the print heads upside down, wipe off the excess blobby ink around the edges. It is imperative that you do not touch the heads anywhere with cotton swabs, cotton cloth, or paper towels! Use the lint-free premoistened window wipes, and do -not- press against the bottom of the heads at all. I fold up a window wipe into sort of a cushion and wipe gently across the bottom. Do this only after cleaning around the edges or you'll just wipe that ink/paper sludge across the print nozzles. Again, it does not have to be spotless.
Reinstall the print heads, put the tape back on the lid switch. Plug the printer in, turn it on, let it finish it's cleaning cycles and gyrations. Turn the printer off again.
On my BJC-6000 and several models, you can get it to print a nozzle check by holding down the Resume/Paper Feed button while turning it on. It beeps once when you turn it on, let go of the Power button but keep holding the Resume button. If you let go after one beep, it does a quick head clean, if you let go after two beeps it prints a nozzle check and alignment check. Three and it just feeds a sheet of paper. Or just connect it to your computer and use the driver Maintenance menu.
Confirm everything is printing correctly again, power off and reinstall the top case. Your Canon should now work for many more years.
If the printheads are badly clogged and the printer driver cleaning cycles aren't fixing it, you may try the following:
First effort: put a few drops of cleaning solution onto the park pad "sponge". This is that sponge-looking thing (actually a hard plastic foam) where the head sits when not printing. Just do whatever it takes on that printer to unpark the heads as if you were going to change cartridges, then close it up and let it sit for a day before you run a cleaning cycle and nozzle check again.
Extremely Thorough Cleaning: Take the head out, remove the cartridges. If you've saved the orange seals, tape them onto the cartridges, if not then wrap black electrical tape around so it covers the ink outlet and the little air inlet on top. Only pull it snug across the ink outlet, not tight, and fairly loose on the cartridge body to prevent tape creep.
I then just stick the head under a stream of hot tap water. I use a soft plastic eyedropper to squirt the above cleaning fluid into the ink inlet meshes on the head and to flush ink off the bottom of the head. Careful not to touch the nozzles!
As you squirt cleaning fluid into the screen, a lot will rush back out, that is fine as it is flushing ink and gunk back out rather than forcing it through the nozzles, which are far finer than a human hair.
When you see little or no more color in the water or cleaning solution, force some of the straight filtered/distilled water into the screens. Rinse the outside of the print head with straight isopropyl alcohol (99% is better than 50% for this) and pat dry with a clean cotton towel (-not- paper towels) and again, DO NOT TOUCH THE NOZZLES.
Patience is a virtue. I've bought a lot of Canon printers in thrift stores with full cartridges because the heads clogged, they bought new cartridges, that didn't fix it so they tossed it at Goodwill. I clean them up and for $12.95 I get $45 worth of brand new cartridges and a backup printer. I only had two heads be unsaveable, those would print on all nozzles but had sprung internal leaks between two colors, cyan and yellow. The symptom was yellow nozzle checks print green, and the ink inside the yellow cartridge slowly turns green.
Reset Canon Pixma iP1980 or Canon iP1900 series
Although software resetter Canon Pixma iP1980 or resetter canon Pixma iP1900 series not available on the internet now. Doesn’t mean there is no way to reset the printer series. My opinion canon Pixma iP 1980 is new version of Canon Pixma iP 1880 so the reset methode for canon iP 1880 can be applied to Reset Canon iP1980. I also tested using reset methode for Canon iP1700 on it’s work on several Printer Canon iP1900 series.
For permanent reset after doing the manual reset you must using software restter. Software resetter such as iPtool and general tool for canon iP 1800 can be used to reset waste ink counter on the Canon iP1980 and Canon iP1900 series. To reset Waste Ink Tank canon iP1980 or iP1900 series follow this steps:
For permanent reset after doing the manual reset you must using software restter. Software resetter such as iPtool and general tool for canon iP 1800 can be used to reset waste ink counter on the Canon iP1980 and Canon iP1900 series. To reset Waste Ink Tank canon iP1980 or iP1900 series follow this steps:
- Press Resume button hold for 1 – 2 minutes
- Open the cover
- Release the catridge and then put catridge again
- Close The Cover
- Turn Off
- then Turn On again
FEATURES

|
SPECIFICATIONS.
| Printing Method | Inkjet Printing, Serial | |
| Print Speed*1 | Black text: | A4 Plain Paper / Max. Speed: 21ppm |
| Colour: | A4 Plain Paper / Max. Speed: 17ppm | |
| Photo (4" x 6"): | PP-201/Standard/Borderless: 55sec | |
| Resolution(dpi)*2 | 4800 x 1200dpi | |
| Ink Droplet Size | min. 2pl | |
| Number of Nozzles | 1472 | |
| Cartridge type | PG-830, CL-831 (PG-40, CL-41XL Optional) | |
| Printable Width | Up to 203.2mm (8inch) | |
| Borderless: | Up to 216mm (8.5inch) | |
| Recommended Printing Area | Top margin: | 38.3mm |
| Bottom margin: | 31.2mm | |
| Applicable Media Sizes | A4, Letter, Legal, A5, B5, Envelopes (DL, COM10), 4" x 6", 5" x 7", 8" x 10" | |
| Borderless | 4" x 6" / 8" x 10" / A4 | |
| Paper Handling | ||
| Rear Tray | Plain Paper: | A4 = 100 |
| High resolution Paper (HR-101N): | A4 = 80 | |
| Photo Paper Pro II (PR-201): | A4 = 10, 4" x 6" = 20 | |
| Photo Paper Plus Glossy II (PP-201): | A4 = 10, 4" x 6" = 20 | |
| Photo Paper Plus Semi-Gloss (SG-201): | A4 / 8" x 10" = 10, 4" x 6" = 20 | |
| Glossy Photo Paper "Everyday Use"(GP-501): | A4 = 10, 4" x 6" = 20 | |
| Matte Photo Paper (MP-101): | A4 = 10, 4" x 6" = 20 | |
| Photo Stickers (PS-101): | 1 | |
| T-Shirt Transfer (TR-301): | 1 | |
| Envelope: | European DL and US Com. #10 = 5 | |
| Paper Weight | ||
| Rear Tray | Plain Paper: | 64-105g/m2 |
| Canon speciality paper: | max paper weight : approx. 260g/m2 (Photo Paper Plus Glossy II PP-201) | |
| System Requirements | Top margin: | 38.3mm |
| Bottom margin: | 31.2mm | |
| Windows | 2000 SP4 / XP SP2 / Vista | |
| Macintosh | OS X 10.3.9 - 10.5 | |
| General | ||
| Interface | USB | |
| Canon Bundled Software | Canon Solution Menu (Windows Only) Easy-PhotoPrint EX | |
| Operating Environment | Temperature: | 5 - 35°C |
| Humidity: | 10 - 90% RH (no dew condensation) | |
| Power | AC 100-240V, 50/60Hz | |
| Acoustic Noise*3 | approx. 44dB(A) | |
| Power Consumption | Standby (USB connection to PC): | approx. 1.0W |
| OFF (USB connection to PC): | approx. 0.6W | |
| Printing *4: | approx. 8W | |
| Environment | Regulation: | RoHS(EU), WEEE(EU), RoHS(China) |
| Eco-Label: | Energy Star | |
| Weight (kg) | 3.3 | |
| Dimension (W x D x H) | 442 x 237 x 152mm | |
| Specifications are subject to change without notice. | |
| *1 | PPM print speed on plain paper is measured using Canon Standard Pattern. Photo print speed is based on the default setting using ISO/JIS-SCID N2 on 4 x 6"Photo Paper Plus Glossy II. Print speed may vary depending on system configuration, interface, software, document complexity, print mode, page coverage, type of paper used etc. and does not take into account data processing time on host computer. |
| *2 | Ink droplets can be placed with a pitch of 1/4800 inch at minimum. |
| *3 | When printing ISO/JIS-SCID N2 pattern on 4x6" Photo Paper Plus Glossy II using default settings. |
| *4 | When printing ISO/JIS-SCID N2 pattern on A4 size plain paper using default settings. |
Tuesday, November 2, 2010
CANON CL SERIES INK CARTRIDGES These cartridges include the Canon CL-30, CL-31, CL-40, CL-41, CL-50, CL-51 & CL-52.
Error Message:
"An ink cartridge that was once empty is installed. U162"
The function for detecting the remaining ink level will be disabled since the remaining ink level cannot be correctly detected. If you want to continue printing without this function, press the <OK> button.
Note: This operation will disable the ink level status detection for that ink tank until the tank is replaced with new Canon ink cartridge.
For those of you that are refilling the same ink cartridge that came with your printer, clicking <OK> will suffice to get you back to printing. The only drawback will be the ink level monitor might not be recognizing the levels of ink. Canon is so aggressive with its ink programming, that they force you to buy their expensive ink cartridges
Error Message: "An ink cartridge cannot be recognized"
This error will occur when you swap out your cartridge into another printer when the ink counter is still working. In other words, you can only use the cartridge that was originally put in the printer in the first place. That means you can't "borrow" your coworker's CL cartridges and use them, you can't take them from your fathers's IP Pixma to print out your essays. This also applies to the InkCloners.com cloned CL series cartrides. Any other printer using that cartridge will see the cartridge as a "used" cartridge and will not function.
Solution: Take the cartridge out of the machine, turn the power off, turn the power back on, re-install the cartridge and hit the resume button the printer will reset itself so you can start printing again
Trick for the "NOT RECOGNIZED" Error Message:
Try this tool to reset your Canon iP Printer: download iPTool.zip
CANON DRIVERS
1.) Pixma MX310
EPSON INK CARTRIDGES
Error Message: "An ink cartridge cannot be recognized" aka non-genuine ink warning message
This error will occur when using non-OEM ink cartridges or there might be a conflict with the cartridges and printer.
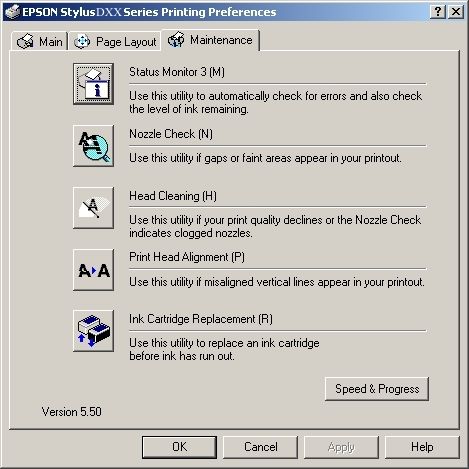
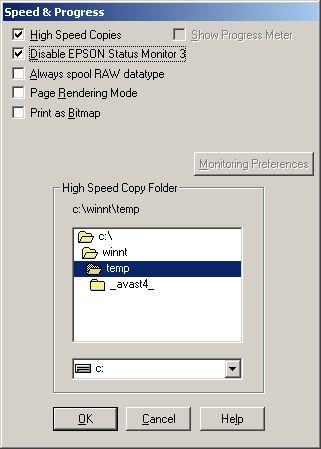
Solution: Disabling the EPSON Status Monitor is the only way to stop annoying warning messages due to using third-party ink cartridges including the non-genuine ink warning message.
DELL INK CARTRIDGES
Error Message: "Low or No Ink"
This happens because there is no way to reset the chip that reads the ink levels, so the cartridge is reading the old ink level and not the new, refilled one. Especially with Dells and Lexmarks, this is quite common; but directions are enclosed with each cartridge on how to bypass this error message so you can still print. Below is a picture of what usually pops up. Just tick the "Don't display this dialog box again" to continue printing.

BROTHER INK CARTRIDGES
Error Message: "Cartridge Empty"
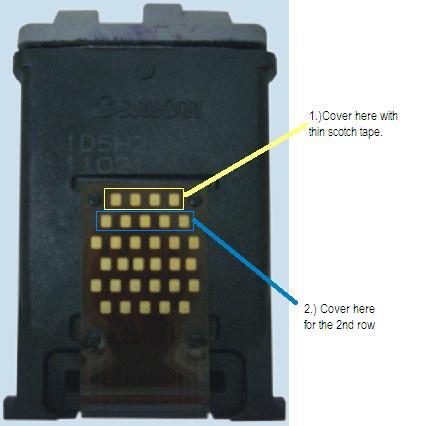
Most Brother printers have an LED light sensor that checks whether the ink is full or not, a faulty system. If the beam of light bounces back, from the reflection of the ink in the cartridge, the machine assumes there is ink in the cartridge and continues to operate. If the light does not bounce back, the light passes through the cartridge and the machine assumes that the cartridge is empty and starts beeping empty. The solution is to cover the eyes that read the ink level.
"An ink cartridge that was once empty is installed. U162"
The function for detecting the remaining ink level will be disabled since the remaining ink level cannot be correctly detected. If you want to continue printing without this function, press the <OK> button.
Note: This operation will disable the ink level status detection for that ink tank until the tank is replaced with new Canon ink cartridge.
For those of you that are refilling the same ink cartridge that came with your printer, clicking <OK> will suffice to get you back to printing. The only drawback will be the ink level monitor might not be recognizing the levels of ink. Canon is so aggressive with its ink programming, that they force you to buy their expensive ink cartridges
Error Message: "An ink cartridge cannot be recognized"
This error will occur when you swap out your cartridge into another printer when the ink counter is still working. In other words, you can only use the cartridge that was originally put in the printer in the first place. That means you can't "borrow" your coworker's CL cartridges and use them, you can't take them from your fathers's IP Pixma to print out your essays. This also applies to the InkCloners.com cloned CL series cartrides. Any other printer using that cartridge will see the cartridge as a "used" cartridge and will not function.
Solution: Take the cartridge out of the machine, turn the power off, turn the power back on, re-install the cartridge and hit the resume button the printer will reset itself so you can start printing again
Trick for the "NOT RECOGNIZED" Error Message:
- 1 - cover the contacts of the 1st row with tape.
- 2 - put the Cartridge in the printer, it will say "cartridge not inserted"
- 3 - take the Cartridge out of the printer
- 4 - cover the contacts of the 2nd row with tape.
- 5 - put the Cartridge in the printer and same error will ocour.
- 6 - take the Cartridge out of the printer.
- 7 - take both tapes off from the Cartridge
- 8 - put the Cartridge in the printer, it will now tell you that the Cartridge is full.
- 9 - do this for the color first. It is ususally the trouble one. Then continue to the black one.
- **10(update 4/2008) - people have had luck applying a strip of tape to the bottom row first instead of the top row.
Try this tool to reset your Canon iP Printer: download iPTool.zip
CANON DRIVERS
1.) Pixma MX310
EPSON INK CARTRIDGES
Error Message: "An ink cartridge cannot be recognized" aka non-genuine ink warning message
This error will occur when using non-OEM ink cartridges or there might be a conflict with the cartridges and printer.
Solution: Disabling the EPSON Status Monitor is the only way to stop annoying warning messages due to using third-party ink cartridges including the non-genuine ink warning message.
- Select 'START'
- Select 'Control Panel'
- Select 'Printer and Faxes'
- 'Right' Click on your printer icon Select 'Printer Preferences'
- Find the box that reads 'Speed and Progress'
- Click in the empty box next to 'Disable Epson Status Monitor' A tick will appear in the box
- Select 'Save'
- 1) Work directly with CSIC in Epson Stylus printers cartridges.
- 2) Reset or rewrite any chip using special addon device.
- 3) Freeze internal ink counters.
- 4) Reset internal ink counters even with empty cartridges.
- 5) Separate cleaning of color and black heads for all Epson inkjet printers, powerful cleaning mode.
- 6) Hot swapping of cartridges supported.
- 7) Resetting of protection counter (even then it is already full).
- 8) More then 100 different Epson printers supported
DELL INK CARTRIDGES
Error Message: "Low or No Ink"
This happens because there is no way to reset the chip that reads the ink levels, so the cartridge is reading the old ink level and not the new, refilled one. Especially with Dells and Lexmarks, this is quite common; but directions are enclosed with each cartridge on how to bypass this error message so you can still print. Below is a picture of what usually pops up. Just tick the "Don't display this dialog box again" to continue printing.
BROTHER INK CARTRIDGES
Error Message: "Cartridge Empty"
Most Brother printers have an LED light sensor that checks whether the ink is full or not, a faulty system. If the beam of light bounces back, from the reflection of the ink in the cartridge, the machine assumes there is ink in the cartridge and continues to operate. If the light does not bounce back, the light passes through the cartridge and the machine assumes that the cartridge is empty and starts beeping empty. The solution is to cover the eyes that read the ink level.
- LC41 Cartridges-cover the front part of the cartridge("spine" looking part) with a small piece of black tape or black it out with a sharpie or permanent marker.
- LC51 Cartridges-cover the bottom part of the cartridge(square holed groove in the center) with a small piece of black tape or scotch tape and black it out with a sharpie or permanent marker.
- Toner Cartridges-cover the both sides where you notice a clear eye
Subscribe to:
Posts (Atom)